
Sending HTML Emails with Drupal 7, Webform, and Mandrill
By default, Drupal is configured to send out plain text emails. For many developers, plain text email is sufficient and preferable to HTML email. HTML email is still, in this day and age, not guaranteed to render the same across email clients, more likely to be labeled as spam, and requires a significant amount of testing to make sure it works. Still, a minimally styled HTML message can be easier for recipients to read and help reinforce your brand/design (if you don’t depend on images to do so). In this article, we’ll look at the modules to install and configure to enable HTML emails and, specifically, how to change the default Webform email template to send submissions as HTML.
1. Set up your site to send email
In the hopefully distant past, your server would have a Mail Transfer Agent (MTA) installed in order to send email messages to other MTAs. On Linux systems, this was usually handled by Sendmail, Postfix, or Exim. Configuring these packages, maintaining them, and ensuring they aren’t exploitable by spammers. Luckily this is a time drain we no longer have to deal with.
Instead, transactional email providers can handle outgoing email, and the headaches involved, for us. Depending on your hosting provider, you may have one already available. If not, I like to recommend Mandrill, which “runs on the delivery infrastructure that powers MailChimp.” Besides having a top-of-the-line service behind it, it has a very generous free tier that allows sending 12,000 emails at no cost each month.
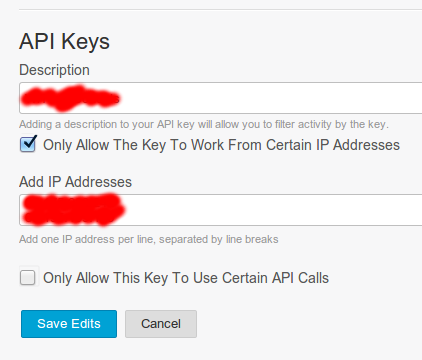
Once you’ve signed up for the service, you need to create an API key so that your Drupal site can use the service. From the Mandrill app dashboard, click on Settings and in the bottom half of the screen, click on + New API Key. From there, enter a good description for the key. You’ll see that you can also restrict what IPs can use the key as well as what API Calls each key can use (You’ll want to give a key at least the Send privileges).
Once you’ve created your key, it’s time to setup Drupal to connect to Mandrill and use it for outgoing email. The quickest way to do this is to use the SMTP Authentication Support
This module allows Drupal to bypass the PHP mail() function and send email directly to an SMTP server. The module supports SMTP authentication and can even connect to servers using SSL if supported by PHP.
Install it using drush with the commands below, or download and enable it via the Modules page.
drush dl smtp
drush en smtp
Once it’s enabled, navigate to Admin > Configuration > SMTPAuthentication Support . The path will be admin/config/system/smtp. Once there, under SMTP Server Settings set smtp.mandrillapp.com as the SMTP Server, with the default port of 587. In the SMTP Authentication section, enter your Mandrill login as the Username and the API Key you created earlier as the Password. To ensure your settings are working, tick the Enable debugging checkbox before you click the Submit configuration button. If you don’t receive a test email, check your settings and API key restrictions before proceeding.
2. Allow outgoing email to use HTML
This is the crucial part where we configure Drupal to send HTML emails instead of plain text ones. We need two modules for this, MIME Mail which in turn depends on Mail System. Note also that MIME Mail depends on Drupal core > 7.23, so make sure you’re running at least 7.24. Install both modules with drush as follows and answer yes when asked to download the mailsystem module:
drush dl mimemail
drush en mimemail
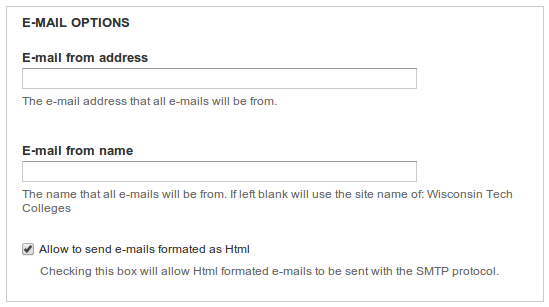
Next, go to to Admin > Configuration > Mime Mail to configure the MIME mail module settings. You can change the From: name and email address here, and in the select menu labelled E-mail format choose a text format that allows some HTML formatting. You could even create one that is tailored for outgoing email, which we’ll see later. Optionally you can choose to include your site’s style sheets in the emails, but I recommend creating a mail.css file in your theme instead and leaving this unmarked. Save your settings and proceed.
Finally, and this was the most difficult part to figure out, we need to configure the Mail System module. Go to to Admin > Configuration > Mail System From this form, we’ll create a new class for sending email and tell drupal to use it. First, expand the New Class field set. Here we’ll pick the classes that handle formatting and sending email and the module will generate a new class based on the ones we select. Select MimeMailSystem in the Class to use for the format() method and Select SmtpMailSystem in the Class to use for the mail() method, as shown in the figure below and then save the settings.
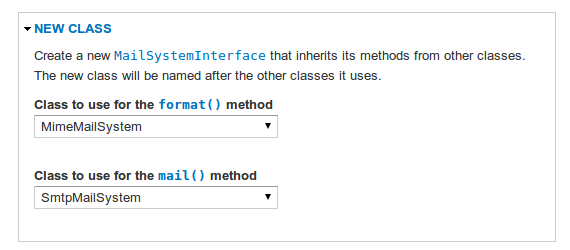
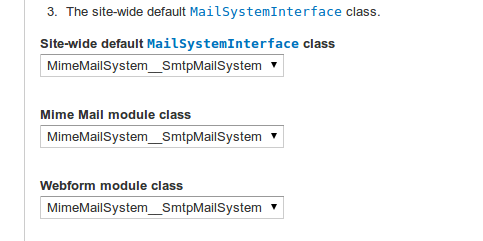
When the page reloads, you’ll see a new option in the class select menus in the Mail System Settings field set. The new class will be named MimeMailSystem_SmtpMailSystem, indicating the format() and mail() selections. Choose the new class in the Site-wide default and Mime Mail module class select menus then save the settings.

Finally, we have to tell the SMTP module to allow HTML emails. A new checkbox will be shown on the SMTP Authentication Support settings form under E-Mail Options. Make sure it’s checked, then save the settings.
At this point, your Drupal site is configured to format outgoing emails as HTML. But the emails sent my modules, such as the User module’s email when a new password is requested, will need a template or formatting to send legible emails.
4. Formatting Outgoing Email
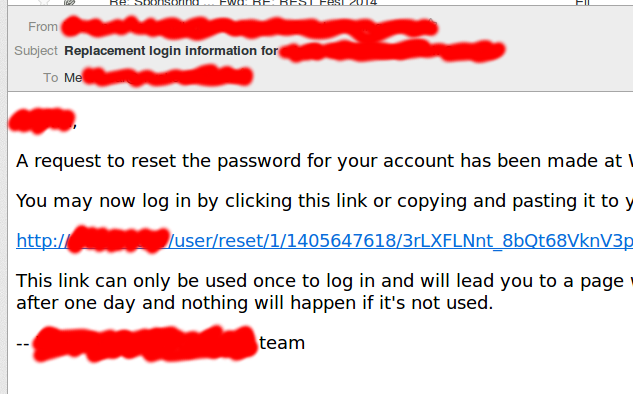
One way to do this, as mentioned earlier, is to create an HTML Email text format that automatically adds paragraphs based on new lines and turns URLs and email addresses into clickable links. A sample one I created recently is shown in the figure below. Note that if you limit the HTML tags allowed, you have to use only those tags in custom templates. Once your text format is created, go to the MIME mail settings screen an select it as the E-mail format.

A text filter like the one above will ensure that the default emails look nice, as in the image below. If you want to include headers, bold tags, or even images, you’ll have to add that to the message template. For the User module, you can edit the template at Admin > Configuration > People > Account Settings. Scroll to the bottom of the page, below the E-mails heading are vertical tabs, one for each kind of email (password reset, new account welcome, etc).
4. Send Webform Submission as HTML Emails
In this section, we’ll see how to override emails that use templates files in your theme. The Webform module is my go to module for creating forms that send emails to site admins and visitors. It is lightweight, scalable, and comes with a lot of functionality prebuilt along with companion modules to augment its capabilities.
Of note, there is also the Entityform module which meets the same basic need. Which one you choose is up to you and the requirements for your project, see When to Use Entityform for a comparison of the two.
First, we need to tell the Mail System to use our SMTP and MimeMail Class for outgoing webform messages. Go to admin/config/system/mailsystem, expand the last section New Setting, and select “Webform >> Webform Module” in the Module select. You can leave the key field below empty, then Save Settings.
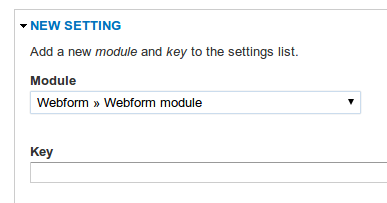
When the page refreshes, you’ll see a new select dropdown for Webform module class. Select our old friend, MimeMailSystem_SmtpMailSystem and save the settings again.
Webform’s emails can be overridden by custom templates in your theme folder, for all emails or even for specific webforms. You’ll find the instructions for doing so in the module’s themeing instructions webform/THEMEING.txt, the relevant section is shown below.
Theme submission e-mails
-----------------------
The default e-mails sent by webform are fairly basic. If you like, you may
customize the display of e-mails sent by each individual webform.

- Open the Webform module directory.

- Copy (do not move!) the "webform-mail.tpl.php" file to your theme directory.

- Open up the new file and edit it to your liking. The webform-mail.tpl.php file
  contains further instructions on how to get started with theming the e-mail.

- If you want to edit the e-mail sent by only one particular webform, rename the
  file "webform-mail-[node id here].tpl.php", replacing [node id here] with the
  node ID of the webform.
The base email template file, webform-mail.tpl.php, renders the submission data using newlines to separate each field of data. If you want to add headings and other HTML formatting to the message, you can do so in the file. But it’d be a pain to have to customize every webform’s email template individually, particularly if you’ll have a lot of webforms or your site’s content editors will be creating them independently. I was puzzled by this at first, until the thought struck me that the module already builds an HTML representation of the submission when it displays that to user’s who can view a submission. There had to be a way to reuse that function, which turned out to be webform_submission_render(). The template code below shows how to do just this, while also respecting the configuration settings for which components to include and exclude in the message.
<?php

/**
 * @file
 * Customize the e-mails sent by Webform after successful submission.
 *
 * This file may be renamed "webform-mail-[nid].tpl.php" to target a
 * specific webform e-mail on your site. Or you can leave it
 * "webform-mail.tpl.php" to affect all webform e-mails on your site.
 *
 * Available variables:
 * - $node: The node object for this webform.
 * - $submission: The webform submission.
 * - $email: The entire e-mail configuration settings.
 * - $user: The current user submitting the form.
 * - $ip_address: The IP address of the user submitting the form.
 *
 * The $email['email'] variable can be used to send different e-mails to different users
 * when using the "default" e-mail template.
 */
?>
<h1><?= check_plain($node->title) ?></h1>

<?php
echo webform_submission_render($node, $submission, $email, 'html');
?>

<p><a href="%submission_url%">View this submission online</a></p>
That’s all there is to it! Remember to create a mail.css file in your theme folder so that you can have some control over the output. After that, its just a matter of testing the emails in as many possible email clients as you can (especially the ones your clients use). Your best bet, still to this day, is to keep it simple and not try to do very fancy layouts. Also, since a lot of email is consumed on mobile and tablet device, don’t bloat them with a lot of CSS or images (which may not be rendered anyway).
Conclusion
Drupal can send nicely formatted emails, if you install and configure the correct recipe of modules. There are a lot of settings to wade through, and potentially some trial-and-error to tweak them and getting working exactly as you need. But you are now familiar with a set of modules to make this work, and hopefully I’ve shown you the basics so that you can better spend your time on crafting beautiful and effective email messages.
Related Links
Leave a comment
Use the form below to leave a comment:


Responses and Pingbacks
July 21st, 2014 at 5:22 pm
[…] Sending HTML Emails with Drupal 7, Webform, and Mandrill […]
September 1st, 2014 at 8:15 am
Hello Oscar,
Thank you for your nice article.
I need to make an html mail in Drupal and this seems a good solution, but before starting, I only have a few concerns:
Is Mandrill used for all outgoing mail, or can you choose for every webform what method you want.
Is every mail in html, or is it also possible to choose for every webform.
Best regards,
Serge, Antwerp – Belgium
October 24th, 2014 at 2:25 am
Very helpful.
Thank you.
October 31st, 2014 at 11:25 pm
Your tutorial worked fine for me. A big thank you
November 29th, 2014 at 9:09 pm
Hey Oscar, just curious to know if you tried the Mandrill module. If you did, why did you go this route instead of using that module? Was it just because these instructions will work with any e-mail provider?
December 1st, 2014 at 10:23 am
Ryan, I prefer the SMTP module since it works with any provider. While the client I did this for stuck with Mandrill, there was also the chance that they’d want to use a different (or their own) email server.
Do you know if the Mandrill module has any advantages over SMTP? Performance maybe?
February 17th, 2015 at 7:09 pm
Is there any way to get the Webform module to use a WYSIWYG editor for creating the HTML email content sent after submission?
September 1st, 2015 at 10:56 am
Killer tutorial Oscar, thank you!
June 25th, 2019 at 8:16 pm
Thanks for this write-up. I’m on Pantheon using Sendgrid’s API instead of SMPT as per their instructions. I did not use MimeMail, instead I implemented HTML Mail module but these instructions transferred very well.